How to Use OpenAI API in ReactJS to Create a Text Summarization Tool

Introduction:
In this tutorial, we'll learn how to harness the power of OpenAI's API to create a text summarization tool using ReactJS. By the end of this guide, you'll have a fully functional application that can condense long passages of text into concise summaries. We'll be utilizing Tailwind CSS to style our application and make it visually appealing. So, let's dive in and start building!
Prerequisites:
- Basic knowledge of ReactJS
- Familiarity with HTML and CSS
- An OpenAI API key (learn how to get one here: https://www.youtube.com/watch?v=bPG5d0o4BhU)
Step 1: Setting Up the React Project First, open your terminal and navigate to the directory where you want to create your project. Run the following command to create a new React project with Tailwind CSS:
npx create-react-app my-app
cd my-app
Step 2: Installing and Configuring Tailwind CSS Now, let's install Tailwind CSS as a dev dependency. In your terminal, run:
npm install -D tailwindcss postcss autoprefixer
npx tailwindcss init -p
Next, replace the contents of your tailwind.config.js file with the following:
module.exports = {
  content: [
    "./src/**/*.{js,jsx,ts,tsx}",
  ],
  theme: {
    extend: {},
  },
  plugins: [],
}
Open your src/index.css file and replace its contents with:
@tailwind base;
@tailwind components;
@tailwind utilities;
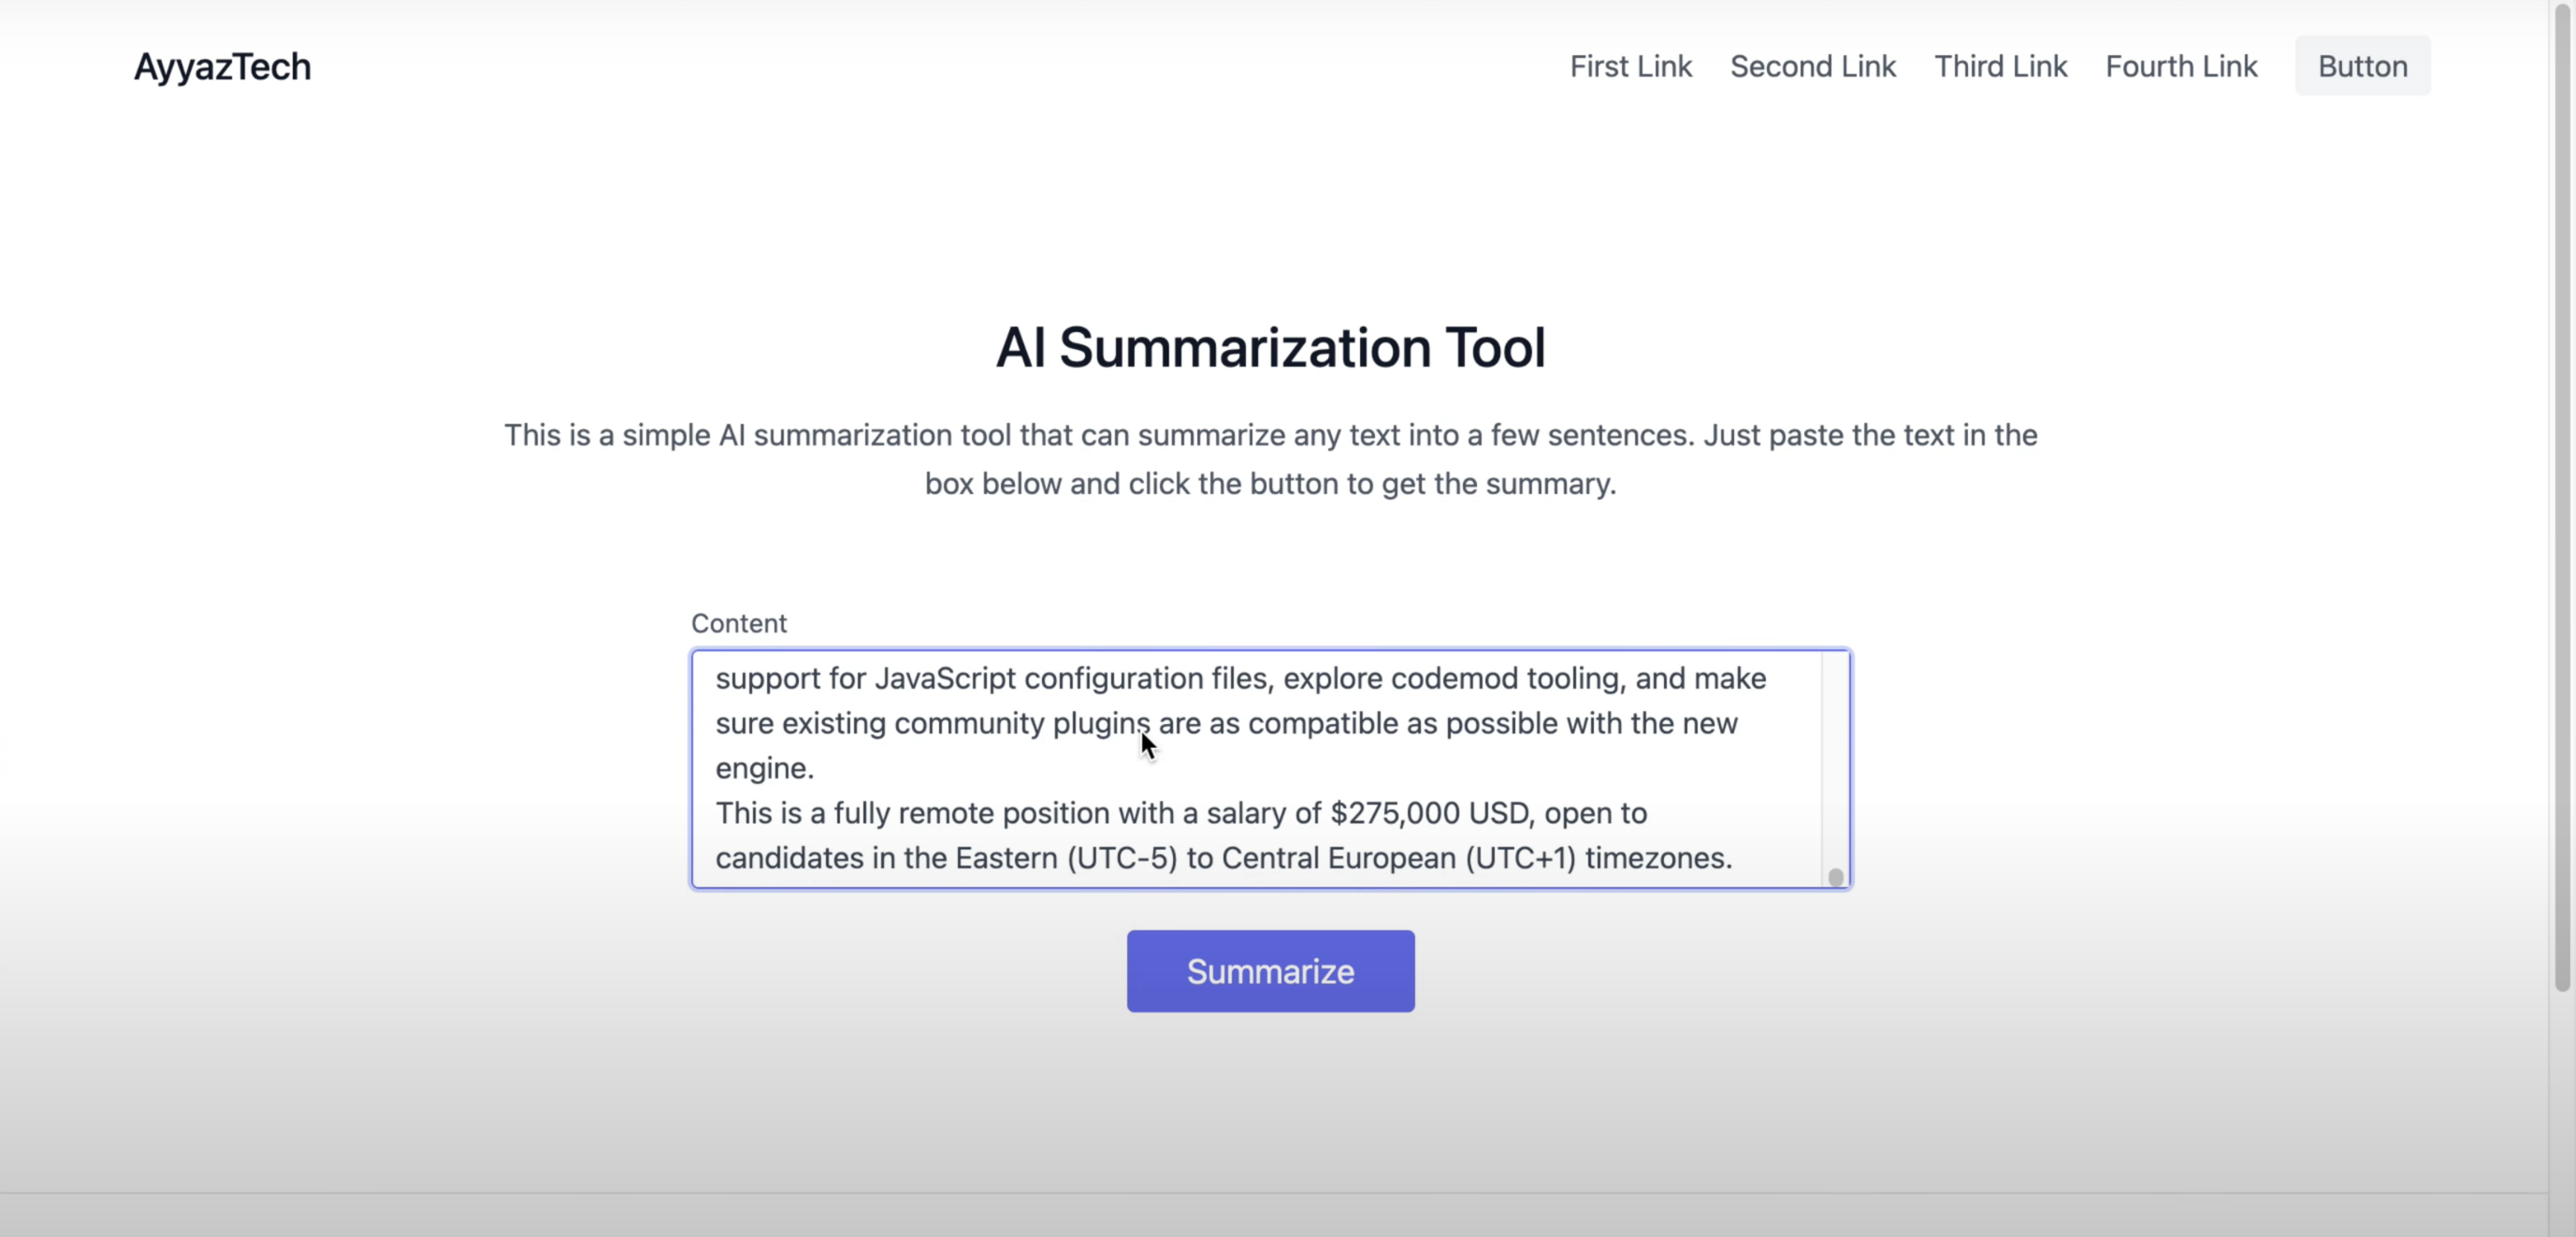
Step 3: Creating the User Interface Let's start building our application's user interface. We'll be using pre-built components from Tailwind CSS to speed up the process.

Replace the contents of your src/App.js file with the following code:
import React, { useState } from 'react'

export default function App() {

  const [content, setContent] = useState('')
  const [summary, setSummary] = useState('')


  const summarize = async () => {
    const apiUrl = 'https://api.openai.com/v1/chat/completions'
    const apiKey = 'YOUR_API_KEY'
    const headers = {
      'Content-Type': 'application/json',
      'Authorization': `Bearer ${apiKey}`
    }

    const data = {
      model: 'gpt-3.5-turbo',
      messages: [
        { role: 'system', content: 'You are a helpful assistant. and you have to summarize the text provided by the user.' },
        { role: 'user', content }
      ]
    }

    const response = await fetch(apiUrl, {
      method: 'POST',
      headers,
      body: JSON.stringify(data)
    })

    const result = await response.json()
    const summary = result.choices[0].message.content

    setSummary(summary)

  }

  return (
    <>
      <header className="text-gray-600 body-font">
  <div className="container mx-auto flex flex-wrap p-5 flex-col md:flex-row items-center">
    <a href="/" className="flex title-font font-medium items-center text-gray-900 mb-4 md:mb-0">

      <span className="ml-3 text-xl">AyyazTech</span>
    </a>
    <nav className="md:ml-auto flex flex-wrap items-center text-base justify-center">
      <a href="/"  className="mr-5 hover:text-gray-900">First Link</a>
      <a href="/"  className="mr-5 hover:text-gray-900">Second Link</a>
      <a href="/"  className="mr-5 hover:text-gray-900">Third Link</a>
      <a href="/"  className="mr-5 hover:text-gray-900">Fourth Link</a>
    </nav>
    <button

    className="inline-flex items-center bg-gray-100 border-0 py-1 px-3 focus:outline-none hover:bg-gray-200 rounded text-base mt-4 md:mt-0">Button

    </button>
  </div>
</header>


<section className="text-gray-600 body-font relative">
  <div className="container px-5 py-24 mx-auto">
    <div className="flex flex-col text-center w-full mb-12">
      <h1 className="sm:text-3xl text-2xl font-medium title-font mb-4 text-gray-900">AI Summarization Tool</h1>
      <p className="lg:w-2/3 mx-auto leading-relaxed text-base">
        This is a simple AI summarization tool that can summarize any text into a few sentences. Just paste the text in the box below and click the button to get the summary.
      </p>
    </div>
    <div className="lg:w-1/2 md:w-2/3 mx-auto">
      <div className="flex flex-wrap -m-2">

        <div className="p-2 w-full">
          <div className="relative">
            <label htmlFor="message" className="leading-7 text-sm text-gray-600">Content</label>
            <textarea
              value={content}
              onChange={e => setContent(e.target.value)}
            id="message" name="message" className="w-full bg-gray-100 bg-opacity-50 rounded border border-gray-300 focus:border-indigo-500 focus:bg-white focus:ring-2 focus:ring-indigo-200 h-32 text-base outline-none text-gray-700 py-1 px-3 resize-none leading-6 transition-colors duration-200 ease-in-out"></textarea>
          </div>
        </div>
        <div className="p-2 w-full">
          <button   onClick={summarize} className="flex mx-auto text-white bg-indigo-500 border-0 py-2 px-8 focus:outline-none hover:bg-indigo-600 rounded text-lg">Summarize</button>
        </div>

      </div>
    </div>
  </div>
</section>

    {/* Summary */}
<hr />
<section className="text-gray-600 body-font">
  <div className="container px-5 py-24 mx-auto">
    <div className="flex flex-col text-center w-full mb-20">
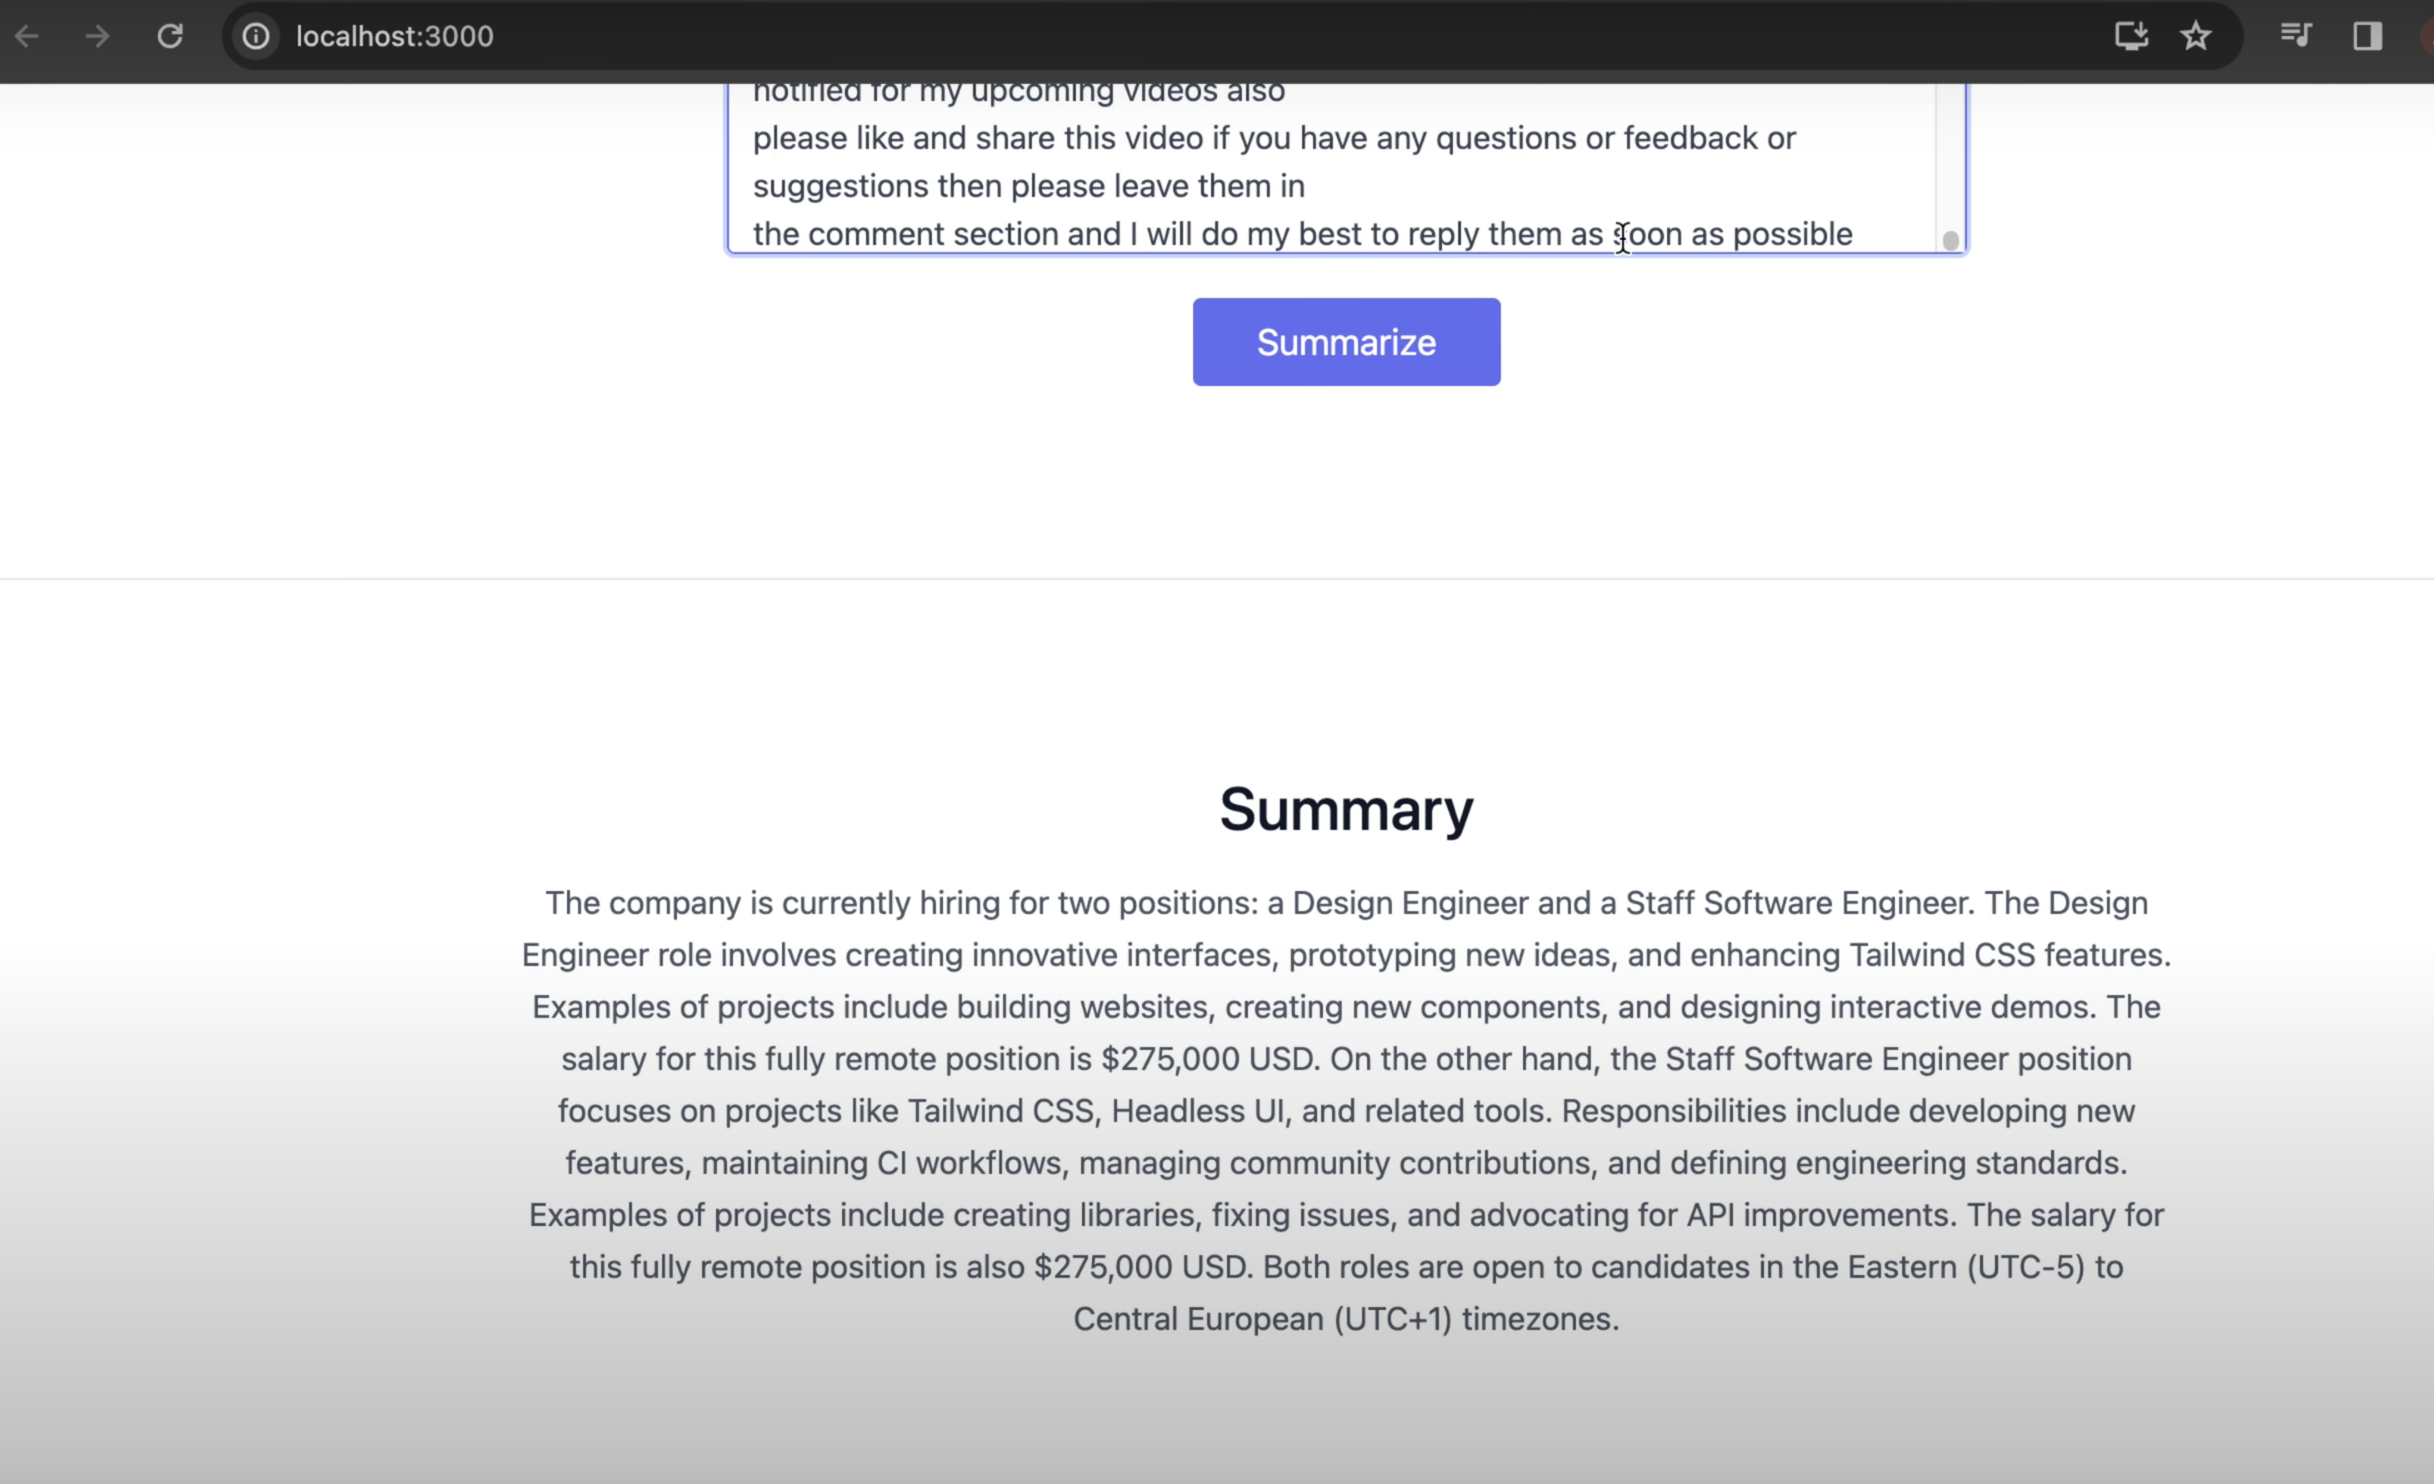
      <h1 className="sm:text-3xl text-2xl font-medium title-font mb-4 text-gray-900">Summary</h1>
      <p className="lg:w-2/3 mx-auto leading-relaxed text-base">
        {summary}
      </p>
    </div>
  </div>
</section>

    </>
  )
}
Step 4: Integrating the OpenAI API Now, let's connect our application with the OpenAI API to generate the summaries. Add the following code inside the handleSummarize function:
const apiKey = 'YOUR_API_KEY';
const url = 'https://api.openai.com/v1/chat/completions';

const headers = {
  'Content-Type': 'application/json',
  'Authorization': `Bearer ${apiKey}`,
};

const data = {
  model: 'gpt-3.5-turbo',
  messages: [
    { role: 'system', content: 'You are a helpful assistant that summarizes text.' },
    { role: 'user', content: content },
  ],
};

fetch(url, {
  method: 'POST',
  headers: headers,
  body: JSON.stringify(data),
})
  .then((response) => response.json())
  .then((data) => {
    const summary = data.choices[0].message.content;
    setSummary(summary);
  })
  .catch((error) => {
    console.error('Error:', error);
  });
Make sure to replace 'YOUR_API_KEY' with your actual OpenAI API key.

Step 5: Testing the Summarization Tool Start your React application by running npm start in your terminal. Open your browser and navigate to http://localhost:3000. You should see your summarization tool up and running!
Try pasting a long passage of text into the text area and click the "Summarize" button. The OpenAI API will process the text and generate a concise summary, which will be displayed below.

Conclusion: Congratulations! You've successfully created a text summarization tool using ReactJS and the OpenAI API. This tutorial demonstrates the power of combining AI with web development to create useful applications.
If you found this video helpful, please consider subscribing to my YouTube channel for more exciting content. Don't forget to like, share, and leave a comment with your thoughts or suggestions for future videos.
Happy coding!
Related Videos:
- From Coders to Creatives: 9 Must-See Uses of ChatGPT 4 Vision! (https://www.youtube.com/watch?v=qN9CiYmfQIM)
- React & Tailwind CSS: Crafting a Quiz App Guided by ChatGPT 4 (https://www.youtube.com/watch?v=-Y_khYHLTr4)
- React & Tailwind CSS: Crafting a Quick Image Editor Guided by ChatGPT (https://www.youtube.com/watch?v=14-Bkt17i1M)
GITHUB Repo: https://github.com/ayyazzafar/reactjs_17_tutorials_code